ASP .NET Core
To dockerize your existing ASP.NET Core application, you need to install docker first. This article will explain on how to leverage docker-compose. To do development inside a docker container, you need to create a docker image.
Let’s open a terminal and create a directory to put our project files, call it aspnetdocker.

Then create a new asp.net mvc project, or in this example we will clone an existing asp.net core application from here.

Dockerfile
As you can see there is a Dockerfile inside directory LatihanUKSW, let’s examine the content:
This file contains hidden or bidirectional Unicode text that may be interpreted or compiled differently than what appears below. To review, open the file in an editor that reveals hidden Unicode characters.
Learn more about bidirectional Unicode characters
| FROM microsoft/dotnet:2.1-sdk AS build | |
| WORKDIR /app | |
| COPY . . | |
| RUN dotnet restore | |
| WORKDIR /app/Latihan.Web | |
| RUN dotnet publish -c Release -o out | |
| FROM microsoft/dotnet:2.1-aspnetcore-runtime-alpine AS runtime | |
| WORKDIR /app | |
| COPY –from=build /app/Latihan.Web/out ./ | |
| ENTRYPOINT [ "dotnet","Latihan.Web.dll","–urls","http://0.0.0.0:80" ] |
Here we use dotnet 2.1 sdk image from Microsoft, because the LatihanUKSW project was built using dotnet core 2.1. Then give it a name : build, after that set the working directory to /app then copy current directory contents to the working directory and then run dotnet restore to restore the dotnet packages.
After restoring the packages, set the working directory to /app/Latihan.Web then run dotnet publish to publish the application to folder out.
Then initialize a new build stage with microsoft/dotnet:2.1-aspnetcore-runtime-alpine as the base image, set the name to runtime. Set the working directory to /app, copy the contents of /app/Latihan.Web/out from build stage to current workdir whic is /app. And finally set the entrypoint to run on port 80.
Now with the dockerfile is complete, we can use it to build our own docker image and tagged it as LatihanUKSW. Open the terminal, change directory to LatihanUKSW then type
docker build . -t latihanuksw
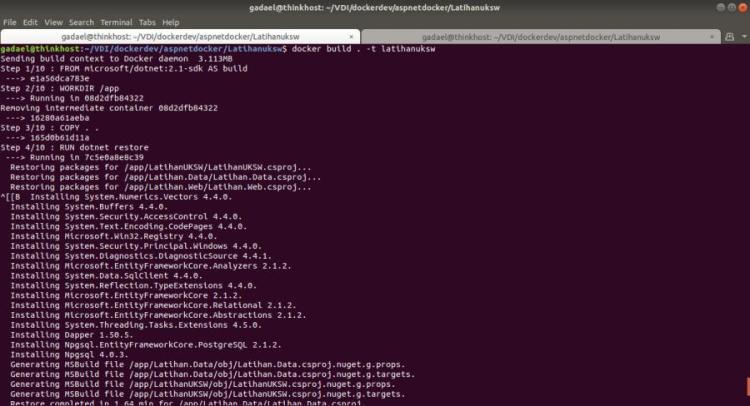
A successful build means that now we have containerized an asp.net core application inside a docker image.
Docker Compose
To simulate a containerization of application development in docker, we will use docker-compose which is a tool for defining and running multi container docker applications. In other words, we put everything inside a container including the database and run all of it at the same time inside docker.
So let’s make a new file called docker-compose.yml in the top directory, and define services and images that we’ll use.
This file contains hidden or bidirectional Unicode text that may be interpreted or compiled differently than what appears below. To review, open the file in an editor that reveals hidden Unicode characters.
Learn more about bidirectional Unicode characters
| version: '3' | |
| services: | |
| webapp: | |
| image: latihanuksw:latest | |
| build: | |
| context : ./Latihanuksw | |
| dockerfile: Dockerfile | |
| environment: | |
| DB_CONN_STRING: "host=postgres_image;port=5432; database=TrainingUKSW; user id=postgres; password=postgres" | |
| ASPNETCORE_ENVIRONMENT: "Development" | |
| ports: | |
| – "81:80" | |
| depends_on: ['postgres_image','adminer'] | |
| postgres_image: | |
| image: postgres:10.5-alpine | |
| ports: | |
| – "5432:5432" | |
| environment: | |
| POSTGRES_USER: "postgres" | |
| POSTGRES_PASSWORD: "postgres" | |
| POSTGRES_DB: "TrainingUKSW" | |
| adminer: | |
| image: adminer | |
| restart: always | |
| ports: | |
| – "8080:8080" |
The above file is the content of our compose file. Basically we define 3 services: the asp.net core app, postgresql database and a web interface to manage the database. Especially for the asp.net core app, we use an image that we build earlier. The other two, we use the base image from dockerhub and set its environment variables appropriately. To demonstrate if the compose file work correctly, open the terminal and type :
docker-compose up -d

if everything works well, you can open the browser and go to localhost:8080 to manage the postgres database, make sure to input the connection string the same as the environment variables that we provide on compose file and make sure to create the tables and views from traininguksw.sql file inside directory Latihanuksw . After that go to localhost:81 to test the asp.net core web application.
Congratulation, now we have a working compose file and successfully containerized our asp.net core application


Full source code is here.
