We’ll make a simple WPF application that consumes a web api. The WPF app is called IDX_NEWS, and the features are : fetching news announcement and view the details from www.idx.co.id.
IDX API
Before begin developing we need to check the website first, go to this url and while the website is loading press F12 to open developer tools -> go to the network tabs and click on XHR to filter the request list. From there we can see there is a lot of requests that were sent to the server, you can click each one to see the url and request payload. Since we only going to develop 2 features for our WPF app, i will pick 2 requests that we can use and those are GetNewSearch and GetNewsDetail. The GetNewsSearch is to get a list of news announcements (articles) and GetNewsDetail is the full detail of one of the articles depending on the Id of the selected news announcement.
WPF Project
WPF is an old framework, before that we used to build a desktop application with WinForms. To be able to develop WPF app faster, we’re gonna use an extension called Prism Template Pack, it will provide us project templates. To make sure the extension is installed, Open Visual Studio 2017 and click on File->New->Project and you should see a Prism entry on left hand side of the new project popup window. Click on the Prism and select Prism Blank App, type the solution name then click Ok.

- NEW WPF prism app.
We’re going to consume this API and bind the data to a ListBox control in WPF. Before that we have to design a layout of Grid with 2 rows and 1 column. And put a ListBox in a position of Grid.Row 0 and Grid.Column 0. The most common panel control in WPF, the is Grid, because it is easier. A WPF grid should have a name and Rows Definitions and or Columns Definitions. Those two definitions will be used to determined a position of the controls inside the Grid. The definitions can be use to divide the available space inside a window into multiple columns and rows. Next put a ScrollViewer in Grid.Row 1 and Grid.Column 0 in the xaml layout. So that we have a listbox in Row 0 to show a list of announcement, and Srollviewer in Row 1 to display the details whenever we select a particular news announcement in the ListBox.
This file contains hidden or bidirectional Unicode text that may be interpreted or compiled differently than what appears below. To review, open the file in an editor that reveals hidden Unicode characters.
Learn more about bidirectional Unicode characters
| <Grid > | |
| <Grid.ColumnDefinitions> | |
| <ColumnDefinition Width="1*"/> | |
| </Grid.ColumnDefinitions> | |
| <Grid.RowDefinitions> | |
| <RowDefinition Height="2*" MaxHeight="200" ScrollViewer.VerticalScrollBarVisibility="Auto"/> | |
| <RowDefinition Height="2*" ScrollViewer.VerticalScrollBarVisibility="Auto" ScrollViewer.HorizontalScrollBarVisibility="Auto"/> | |
| </Grid.RowDefinitions> | |
| <ListBox x:Name="lbNewsAnnouncement" Grid.Column="0" Grid.Row="0" ItemsSource="{Binding NewsAnnouncement.Items}" ScrollViewer.VerticalScrollBarVisibility="Auto" > | |
| <ListBox.ItemTemplate> | |
| <DataTemplate > | |
| <TextBlock Text="{Binding Title}"> | |
| <TextBlock.InputBindings> | |
| <MouseBinding Gesture="LeftClick" Command="{Binding RelativeSource={RelativeSource FindAncestor, AncestorType={x:Type ListBox}}, Path=DataContext.SelectArticle}" CommandParameter="{Binding Id}" /> | |
| </TextBlock.InputBindings> | |
| </TextBlock> | |
| </DataTemplate> | |
| </ListBox.ItemTemplate> | |
| </ListBox> | |
| <ScrollViewer Grid.Column="0" Grid.Row="1" ScrollViewer.HorizontalScrollBarVisibility="Visible" ScrollViewer.CanContentScroll="True"> | |
| <StackPanel HorizontalAlignment="Left" Margin="10" > | |
| <TextBlock x:Name="txtJudul" Text="{Binding Announcement.Title}" FontSize="28"/> | |
| <TextBlock x:Name="txtImageurl" Text="{Binding Announcement.ImageUrl}" Visibility="Hidden"/> | |
| <TextBlock x:Name="txtPublishDate" Text="{Binding Announcement.PublishedDate}" /> | |
| <Image x:Name="artilceImg" Source="{Binding Announcement.ImageUrl}" MaxWidth="300" MaxHeight="350"/> | |
| <wpf:HtmlLabel x:Name="htmlContent" Text="{Binding Announcement.Contents}" /> | |
| </StackPanel> | |
| </ScrollViewer> | |
| </Grid> |
The other panel controls in WPF are Canvas, StackPanel, WrapPanel, DockPanel.
RestSharp
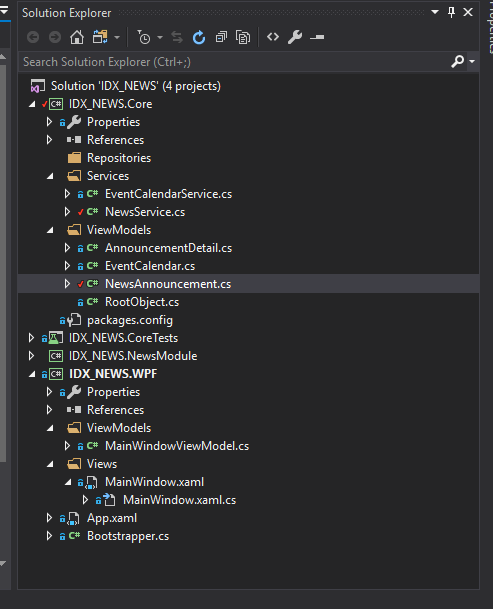
To consume idx.co.id API, we use RestSharp nuget package to get the data. As i mention here, restsharp provides a good mechanism in making http request and handling the reponse. So when the data is retrieved, we’ll bind it to a Model Class that has the same data Structure as the API response. To get a matched data structure with the API response, we can use json2csharp.com or quicktype.io to genereate the model class and it’s properties. Put the Model Class into a separate folder called ViewModels. Also create new folder and named it Services, and create one file called NewsService.cs inside. Don’t forget to put all of it in a separate project (pictures below).
Prism MVVM
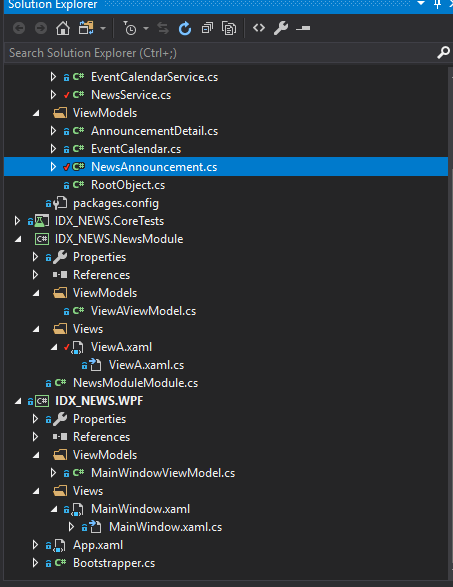
If we look at the project structure, we have 4 projects inside the solution. IDX_NEWS.Core is where we put all of our core operations like consuming web API and binding the response into POCOs. IDX_NEWS.WPF is where the main WPF window is located, this project also act as a startup project, it is the application’s entry point so when we press F5 this project will be run first. IDX_NEWS.NewsModule is a prism module project, because we are going to separate the news announcement and news detail in one module therefore we put it into a separate project. Just in case if we’re going to add more features and capabilities into our application in the future we can simply add new Prism Module Project and register the module inside IDX_NEWS.WPF Bootstrapper.cs. It is also a good practice to separate a module and main window shell, as it makes it easier and helping us to be more focus during development. IDX_NEWS.CoreTests is an NUnit Test project for testing the Core project.
Prism is a framework for building loosely coupled, maintainable, and testable XAML applications in WPF, Windows 10 UWP, and Xamarin Forms. Why Prism? because it’s easier. At least in my opinion. you can find a lot of tutorial on the internet just by searching “wpf prism tutorial”. In short, prism provides basic library that follows the MVVM Patterns and has the flexibility to separate a WPF application into small modules. The magic of MVVN in Prism is a base class called BindableBase, where we basically put an attribute prism:ViewModelLocator.AutoWireViewModel=”True” into our view and prism will take care the binding from View to ViewModel.
When using Prism Extension Pack, we can easily add new Module project and the extension will create one empty View and it’s ViewModel. All inside the correct folder according to the MVVM patterns.
Inside the viewmodel, create two properties; one for the news announcement list, the other for the news detail. Also create one property of type DelegateCommand, we’ll use it to trigger a selection of a particular announcement and get the details from the web API. And one private member of type NewsService, that we’ll use in consuming the API.
This file contains hidden or bidirectional Unicode text that may be interpreted or compiled differently than what appears below. To review, open the file in an editor that reveals hidden Unicode characters.
Learn more about bidirectional Unicode characters
| public class ViewAViewModel : BindableBase | |
| { | |
| private NewsService NewsService; | |
| private NewsAnnouncement newsAnnouncement; | |
| public NewsAnnouncement NewsAnnouncement | |
| { | |
| get { return newsAnnouncement; } | |
| set | |
| { | |
| SetProperty(ref newsAnnouncement, value); | |
| } | |
| } | |
| private AnnouncementDetail _announcement; | |
| public AnnouncementDetail Announcement | |
| { | |
| get { return _announcement; } | |
| set | |
| { | |
| SetProperty(ref _announcement, value); | |
| } | |
| } | |
| public DelegateCommand<long?> SelectArticle { get; set; } | |
| public ViewAViewModel() | |
| { | |
| this.NewsService = new NewsService("http://www.idx.co.id"); | |
| this.NewsAnnouncement = NewsService.NewsAnnouncements(Locale.IdId, 20); | |
| SelectArticle = new DelegateCommand<long?>(Select, CanSelect); | |
| } | |
| private bool CanSelect(long? arg) | |
| { | |
| return true; | |
| } | |
| private void Select(long? itemid) | |
| { | |
| Debug.WriteLine(itemid + "==============>"); | |
| if (itemid.HasValue) | |
| { | |
| Announcement = NewsService.Details(itemid.Value);// | |
| Item singlnews = NewsAnnouncement.Items.SingleOrDefault(d => d.Id == itemid); | |
| } | |
| if (Announcement == null) | |
| { | |
| MessageBox.Show("Article not found."); | |
| } | |
| } | |
| } |
Don’t forget to register the news module inside Bootstrapper.cs, and register the view with region manager inside MainWindowViewModel. So when the application start, it will automatically navigate to NewsModule and show it’s View.
Full source code is here.
There’s more to learn about Prism and MVVM in developing a WPF application. Navigation, regions, event aggregations are some of the feature that hasn’t been covered in this article. I will write more about those features in the next articles.
